
High CPU Usage due to Windows Modules Installer Worker
Sometimes you see the CPU usage in Windows 7/ 8.1/ 10 is very high. During that time, the computer slows down and it is difficult to work with it. This problem happens very often due to Windows Modules Installer Worker. So this is a general question from many Windows users, How to solve the High CPU usage problem?
Windows Modules Installer Worker is nothing other than a Windows service. This service works for searching for new updates. When it finds new updates, it installs them to your computer. To complete its duties, Windows Modules Installer Worker can cause a high CPU usage and it makes your computer slower which runs Windows 8.1/ 10/ 11.
What is Windows Modules Installer Worker?
The Windows Modules Installer Worker, also known as TiWorker.exe, is a vital component of the Windows operating system. Its primary function is to look for new updates and install them onto your system. This process ensures that your computer is up-to-date with the latest features, security patches, and performance improvements.
As we have mentioned, this Windows Modules Installer Worker (TiWorker.exe) is a service of Windows that works to update Windows. The process of TiWorker.exe creates a high CPU usage problem and sometimes it consumes 100% of disk space.
Why Does It Cause High CPU Usage?
High CPU usage by the Windows Modules Installer Worker typically occurs when the service is actively searching for or installing updates. This is a normal part of its operation, but issues arise when this process becomes excessively prolonged or uses an unreasonable amount of system resources. Several factors can contribute to this problem, including corrupted update files, outdated system components, or software conflicts.
Common Symptoms of High CPU Usage
Identifying when the Windows Modules Installer Worker is causing high CPU usage is crucial for timely intervention. Common signs include:
- Sluggish System Performance: Your computer may become noticeably slower, with applications taking longer to open and respond.
- Overheating: High CPU usage can cause your computer to generate more heat than usual, possibly leading to overheating if not addressed.
- Decreased Battery Life: For laptop users, you might observe a rapid drain on your battery life.
- Noise from Cooling Fans: Increased CPU usage will often cause your cooling fans to run at higher speeds, resulting in more noise.
Understanding these symptoms is the first step in diagnosing and addressing the issue effectively.
How to check CPU usage?
- Go to Start menu > find and click on “Task Manager” > Click at View Running Process >Go to Process Tab > Sort it by CPU (It will Show you the CPU usage by name)

Solutions of High CPU usage
There are a few ways to solve this issue. Here we will explain 2 effective ways to solve it.
First way
Solve the High CPU usage problem occurs with Windows Modules Installer Worker

These commands will set your windows to the update to manual and high CPU usage by Windows Modules Installer Worker in Windows 8.1/10 should be fixed.
Second way
Solve the High CPU usage problem occurs with Windows Modules Installer Worker
There is the better solution for Disk load and high CPU usage occurred by Windows Modules Installer Worker.
Let us follow these steps:
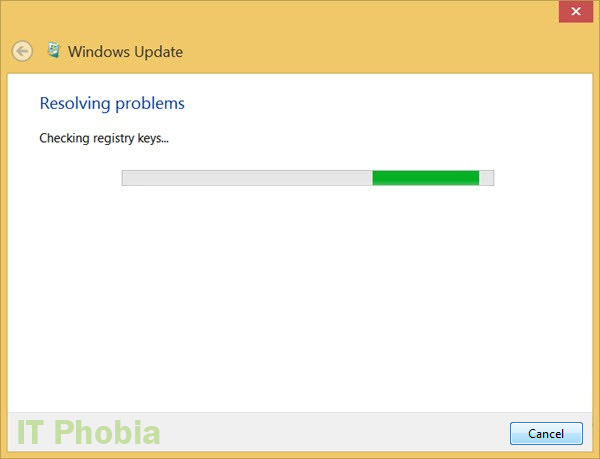
- Get Windows Update Troubleshooter from here (by downloading): download.microsoft.com/download/F/2/2/F22D5FDB-59CD-4275-8C95-1BE17BF70B21/WindowsUpdateDiagnostic.diagcab. If you face any Windows update error here is the fixes for you.
- Run the WindowsUpdateDiagnostic.diagcab tool
- This tool resolves issues by checking registry keys and some more things. This process takes a bit time, so keep patience!
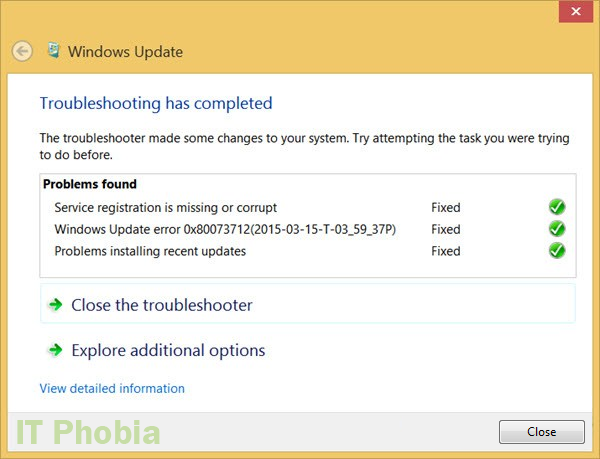
- When you see the message “Troubleshooting has completed”; Click on Close Button
- Now you can reboot your computer. When you see the message “Troubleshooting has completed”; Click on Close Button
- Now you can reboot your computer.
Caution!
After following the method the Windows update set to manual, so you have to check Windows Update regularly (weekly/ monthly) by ownself. Read more about Windows Installer here.
By following any of above-mentioned method you can solve issues. For further help about related issues, please write in the comment box.
Tech Tip: Did you know now you can load/access your all-time favorite windows applications into the cloud having endless hosting space with hosted windows virtual desktop from CloudDesktopOnline.com and remotely access from anywhere, anytime on any device (PC/Android/iOS). Visit Apps4Rent.com to know more about hosted SharePoint and Exchange for enhanced team collaboration.
Tips to reduce CPU resources consumption by windows modules installer worker
In both Laptop & Desktop computer, you may face windows modules installer worker high disk usage windows 10 / 8 / 8.1 or 7. These tips will reduce the consumption of your CPU usage. Let’s get started.
Tip #1
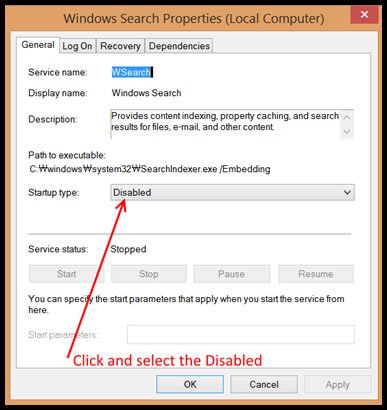
Disable “Windows Search”
1. Go to “Control Panel” from start
2. Find and single click on “Administrative Tools”
3. Find and double-click on “Services”
4. Scroll down and find “Windows Search”
5. Right-Click on “Windows Search”
6. Click on “Properties”
7. Select Startup type “Disabled”
8. Click “Stop” at Service Status
9. Now Click Apply & OK
10. Restart your PC now


Tip #3
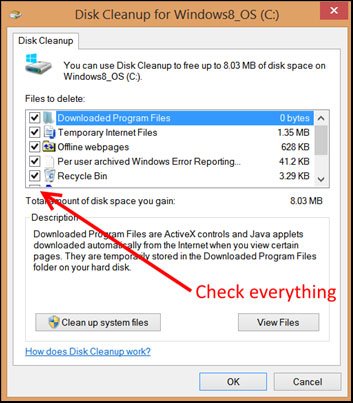
Perform “Disk Cleanup”
1. Go to “My Computer”
2. Right Click on “C drive”
3. Click on “Properties” (Properties window will appear)
4. Find the “Disk Cleanup” button and Click on it (The disk cleanup window will appear it may take time to calculate your cleanup space)
5. Select files you want to be cleaned up (You may check everything, but don’t forget to check “Windows Update Cleanup” and “Service Pack Backup Files”)
6. Now click on the button “Clean up system files”
7. Now restart your PC
Tip #4
Disable “Automatic windows update”
1. Go to “Control Panel” from start
2. Find and single click on “Administrative Tools”
3. Find and double-click on “Services”
4. Scroll down and find “Windows update”
5. Right-Click on “Windows update”
6. Click on “Properties”
7. Select Startup type “Disabled”
8. Click “Stop” at Service Status
9. Now Click Apply & OK
10. Restart your PC now

Fix the High CPU Usage for Windows 10
In the latest release of Windows 10 built TrustedInstaller.exe service is available beside the Windows modules installer worker. This service controls some features like automatic installation, modification, and uninstallation of Windows updates & extra features or components. Installing and uninstalling Windows updates are compulsory matters as per user needs. In recent times, most of the time Windows 10 gets updates from its update server which consumes a lot of CPU and RAM memory. But, you can control this situation if you want. Let’s check how to do it.
Process #1
Set to Metered Connection of Your network (Wi-Fi/ Ethernet) connection
What is the metered connection? A metered connection is defined with a limited data plan which can occur in a smartphone hotspot when the data plan status is limited. It also can be found when the home internet is set to a limited quota by ISP. What can you get by this metered connection? Generally, a metered connection decreases the usage of data which enables more control over it. And what happens when you set the metered connection for your Windows 10 PC? Metered connection settings will help prohibit automatic windows update downloading.

Basically, this metered connection can change the scenario in many aspects such as stopping automatic updates downloading, stopping automatic app updating, “start menu tiles updates downloading”, and also can stop any synchronization for any offline content.
How to configure the Metered Connection Settings?
When you set Metered connection for any Wi-Fi connection, follow the below steps:
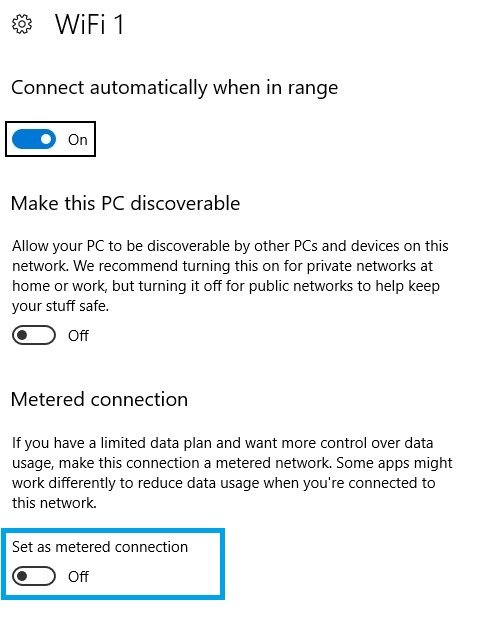
- From your desktop notification panel, Go to Wi-Fi connection, Right-click on Properties.
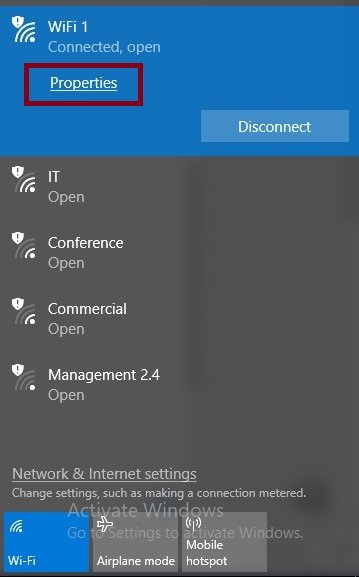
- Now scroll down and find Metered Connection. By clicking the On/Off button, turn-on the metered connection.
When you set Metered connection for an Ethernet connection, follow the below steps:
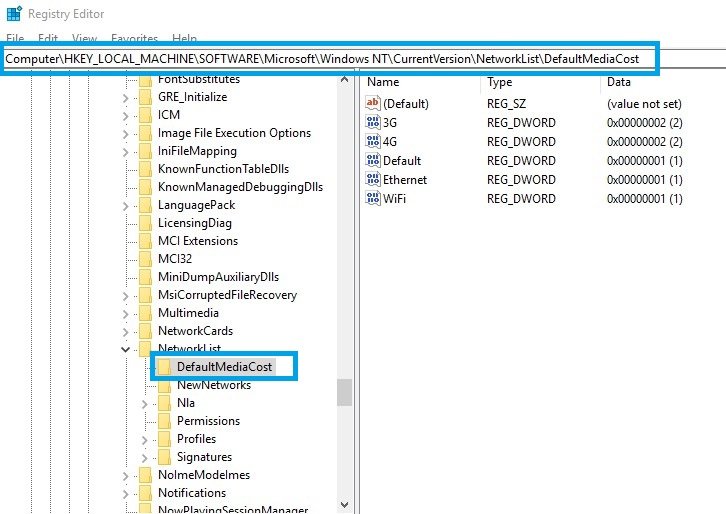
- Go to “Regedit” by searching in the start menu > Search
- Run the “Regedit” as Administrator. To do that, Right-Click on the “Regedit” and select “Run as administrator”.
- Now a confirmation window will appear on the screen, just click on “Yes”. It will allow “Regedit” to make the change of your OS.
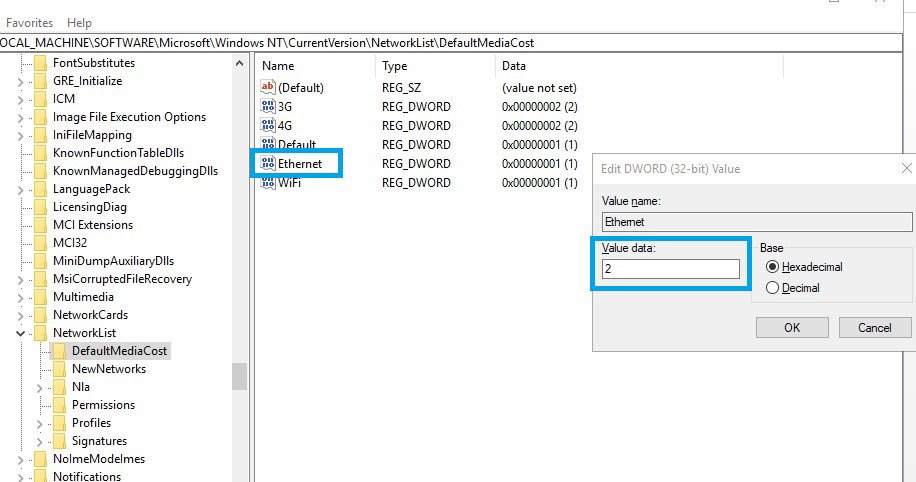
- In this step, check for HKEY_LOCAL_MACHINE > SOFTWARE > Microsoft > Windows NT > CurrentVersion > NetworkList > DefaultMediaCost in the left pane of “Regedit” window. To make the process easier, you can just copy/paste the folder sequence in the top bar marked in the image.
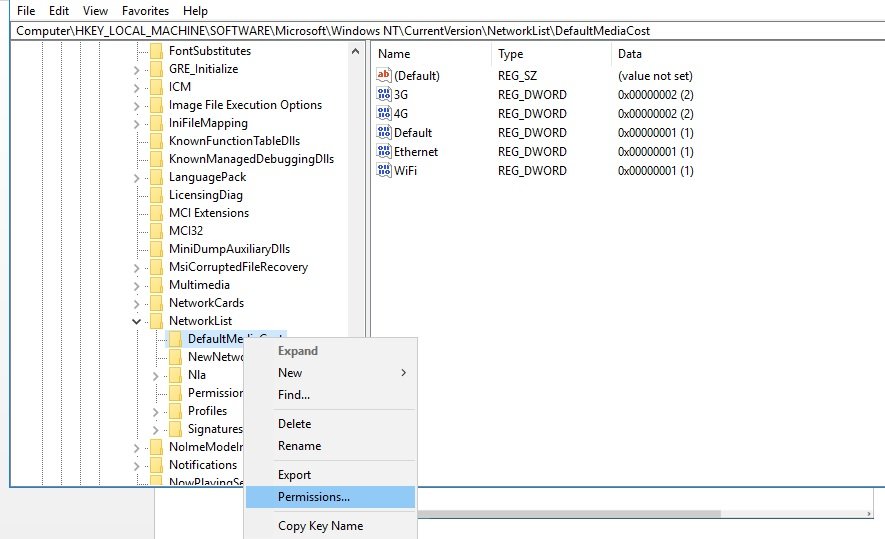
5. Now perform a Right button click on “DefaultMediaCost” folder and click on “Permissions”.
6. Now go to the “Advanced” button in the bottom-right of the Permissions window.

7. Find a link named “Change” at the first line of the window and Click on it.

8. Now go to Enter the object name to select field and type the word administrators, and then click on Check Names which will perform an auto-complete action for your desired object name. Now click Ok button.


9. In this step, Put a tick in the checkbox for Replace on subcontainers and objects; which you can see at the Advanced Security Settings for DefaultMediaCost window. Now click on Apply and then click on Ok.
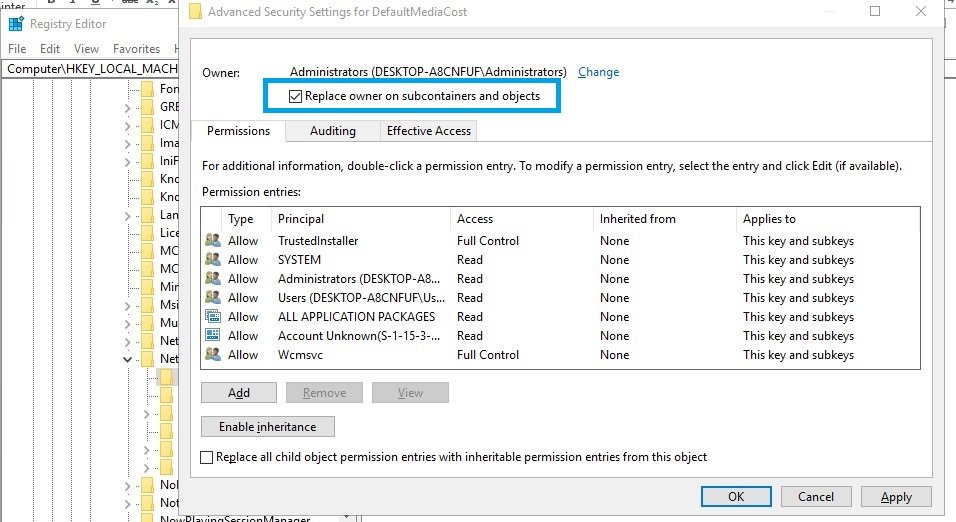
10. Now click on Administrators Group name in the “Group or username” field of “Permissions for DefaultMediaCost”window, after that go to the below field “Permissions for Administrators” and enable the Full Control option by putting a tick mark in the Allow box. Now finish the task by clicking on Apply & Ok.

11. Change the value of Ethernet to 2 instead of 1. To do that just open the Ethernet file by double-clicking and change the value. The Ethernet value 2 indicates the metered connection.
12. In the final step, it is essential to close all the windows and restart the PC.
Process # 2
Disable the Windows Automatic Update Service
The following steps will help you to disable permanently the Windows Automatic Update Service:
Step#1 Go to Run and type services.msc then click Ok.
Step#2 Find Windows Modules Installer and Double-Click on it.
Step#3 Go to General Tab and Click on Stop button to stop the service.
Step#4 Change the Startup Type from Automatic to Manual.
Step#5 Go to Recovery Tab & set Take No Action for Second Failure and Subsequent Failure and then complete it by clicking on Apply and Ok.
Step#6 Now find Windows Update Service, also stop this service and change the startup type to Manual same as Windows modules installer worker service; then finish it by Apply and Ok.
Step#7 Then Go to Recovery tab & set Take No Action for Second Failure and Subsequent Failure and then complete it by clicking on Apply and Ok.
Step#8 In this last step, just close all windows including Services window and reboot your PC.
Hope this will help you to solve your problem.
How to Fix Windows Modules Installer Worker High CPU Usage on Windows 11
1. Running Windows Update
Ensuring that your Windows 11 system is up-to-date is a fundamental step in resolving high CPU usage caused by the Windows Modules Installer Worker. Follow these steps to check for and install updates:
- Go to ‘Settings’ > ‘Update & Security’.
- Click on ‘Windows Update’.
- If there are any pending updates, click ‘Download and install’.
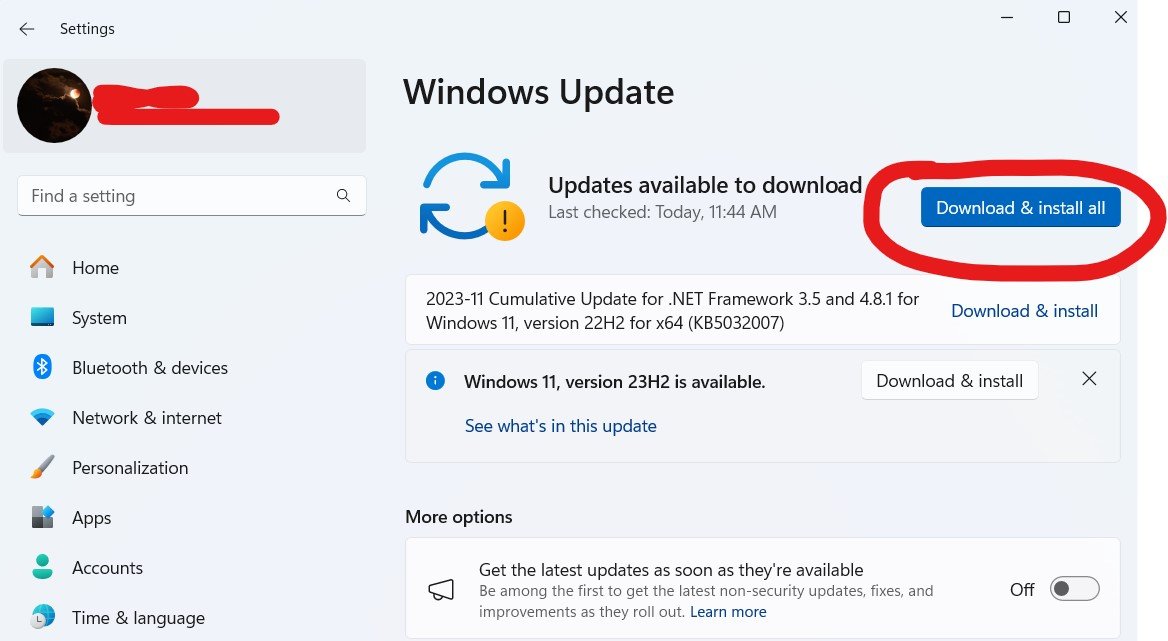
Regularly updating your system can prevent many issues related to outdated software, including excessive CPU usage.
2. Troubleshooting with Windows Update Troubleshooter
Windows 11 includes a built-in troubleshooter that can automatically detect and fix problems with Windows Update. To use this tool:
- Open ‘Settings’ > ‘Update & Security’ > ‘Troubleshoot’.
- Select ‘Additional troubleshooters’.
- Choose ‘Windows Update’ and click ‘Run the troubleshooter’.
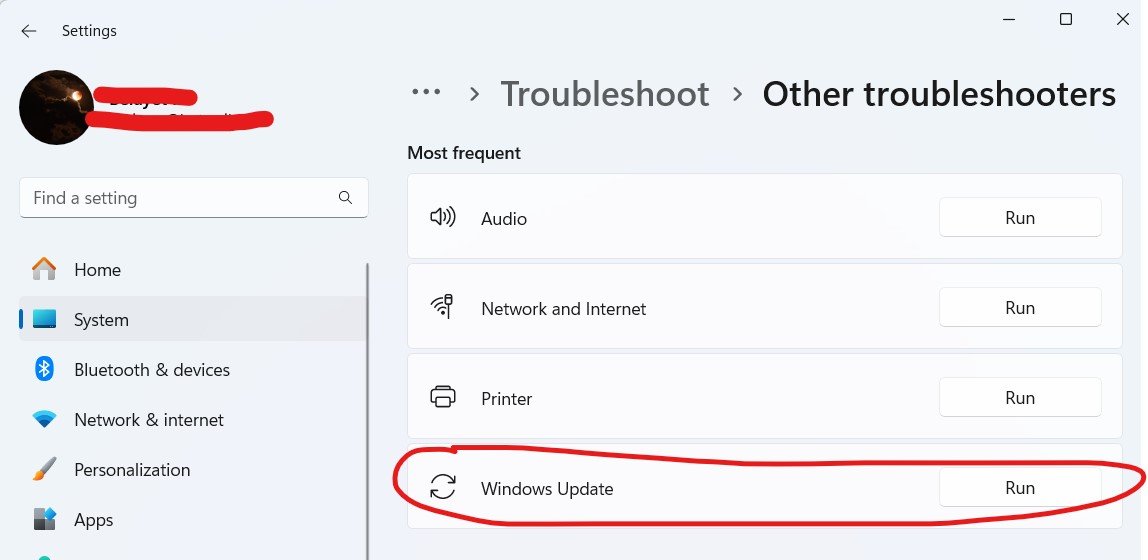
This process can resolve issues preventing normal operation of the Windows Modules Installer Worker.
3. Setting Windows Update to Manual
Changing Windows Update settings to manual allows you more control over when updates are downloaded and installed. This can be useful in managing CPU usage. However, remember that delaying important updates can pose security risks. To change the settings:
- Press ‘Windows Key + R’, type ‘services.msc’, and press Enter.
- Scroll down and find ‘Windows Update’.
- Right-click and select ‘Properties’.
- In ‘Startup type’, choose ‘Manual’ and click ‘OK’.
This change means updates won’t be installed automatically, giving you control over the process.
4. Clearing the SoftwareDistribution Folder
At times, the SoftwareDistribution folder, which stores temporary files required for installing Windows updates, can become corrupt. Clearing this folder can solve CPU usage issues. To do this safely:
- Stop the Windows Update service (as shown in Step 3).
- Navigate to ‘C:\Windows\SoftwareDistribution’ and delete all the files and folders inside.
- Restart the Windows Update service.
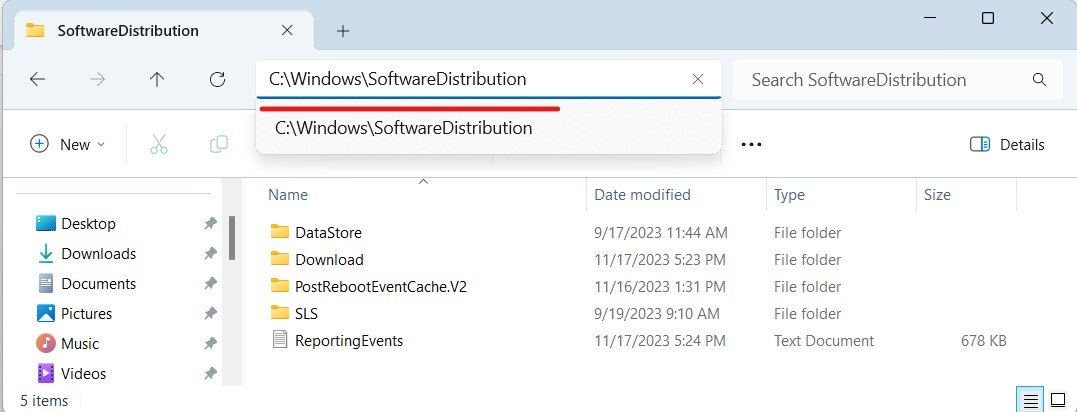
This process will force Windows to create a new SoftwareDistribution folder and can resolve issues with corrupted update files.
5. Performing a System File Check (SFC)
The System File Checker (SFC) is a utility in Windows 11 that allows you to scan for and restore corrupted system files. To run an SFC scan:
- Open Command Prompt as an administrator.
- Type sfc /scannow and press Enter.
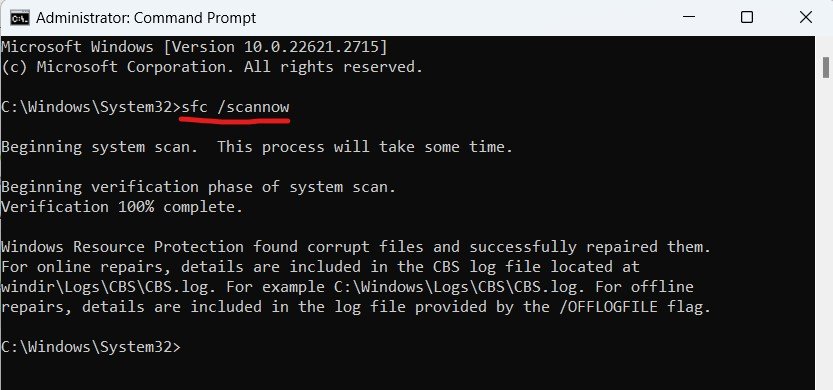
The SFC scan will begin, and any found issues will be repaired automatically.
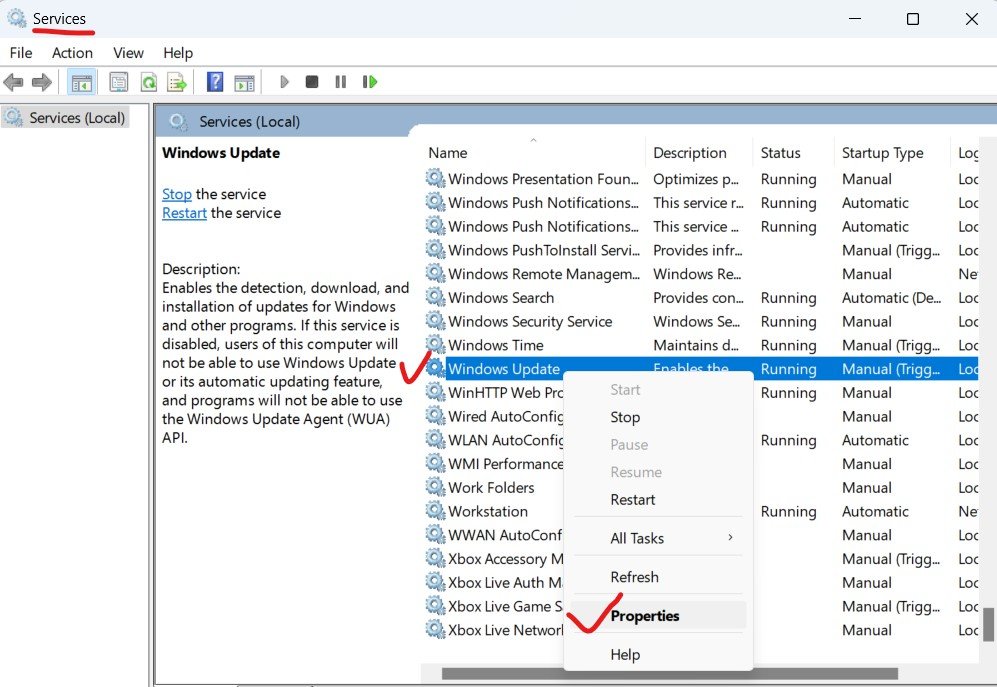
6. Disabling the Windows Modules Installer Worker Temporarily
As a temporary measure, you can disable the Windows Modules Installer Worker. However, this should be done cautiously as it can prevent your system from receiving important updates. To disable the service:
- Press ‘Windows Key + R’, type ‘services.msc’, and press Enter.
- Find ‘Windows Modules Installer’ and double-click it.
- Set ‘Startup type’ to ‘Disabled’ and click ‘OK’.
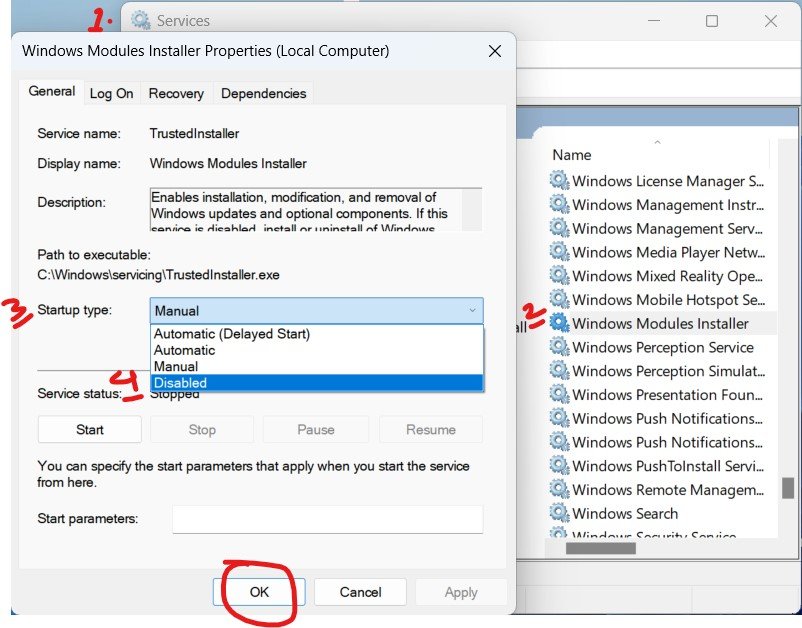
Remember to enable it again after some time to keep your system updated and secure.
7. Opting for a System Restore or Reset
If all else fails, consider using System Restore to roll back your system to a previous state when the issue was not present. If System Restore doesn’t work, a system reset may be necessary. To perform a system restore:
- Type ‘Create a restore point’ in the Windows search bar and open it.
- Go to the ‘System Protection’ tab and click ‘System Restore’.
- Follow the on-screen instructions to choose a restore point.

For a system reset, go to ‘Settings’ > ‘Update & Security’ > ‘Recovery’ and select ‘Get started’ under ‘Reset this PC’.
Our thoughts
Resolving high CPU usage by Windows Modules Installer Worker in Windows 11 is crucial for maintaining your computer’s performance and longevity. By following the steps outlined above, you can effectively tackle this issue. Regular maintenance and updates are key to preventing such problems and ensuring that your system remains efficient and secure.
You might also like
How to get help with File Explorer in Windows 10? Solutions with some Ways
Best way to reset password for windows 10 Administrator, Local, Guest or Server account
10 Tips tо Fix Windows 10 Memory Management Error & More
Microsoft Setup Bootstrapper has stopped working Solved
Essential WiFi Analyzer iPhone Mac Windows App – Improve your Network
Windows host process rundll32 high CPU usage Fix – The Easiest Method
The Hidden Mystery Behind Fitbit app for windows 10
Windows 7 USB/DVD Download Tool – How To Use Tutorial
Windows phone parental controls – Setup Step-By-Step
Windows Update Error 80072EE2 8024400E 8024400A 8024400D Fix step-by-step
I’m a tech enthusiast, entrepreneur, digital marketer and professional blogger equipped with skills in Digital Marketing, SEO, SEM, SMM, and lead generation. My objective is to simplify technology for you through detailed guides and reviews. I discovered WordPress while setting up my first business site and instantly became enamored. When not crafting websites, making content, or helping clients enhance their online ventures, I usually take care of my health and spend time with family, and explore the world. Connect with me on Facebook, Twitter, Linkedin or read my complete biography.
You are welcome!
Hello. I have same problem which its solutions are described here. I tried “first way” bith to manal and windows module installer worker keeps using my cpu somehow. I tried “second way” and the first try it found around 5-6 problems which were fixed. After restart I ran the tool again and it found 3 problems which were fixed. I restarted again and ran the tool and, again, it found 3 problems which were fixed. Seems to me there should be something else (which I have no clue of what may be) because its finding and fixing the same problems three times in a row.
What Windows Update says is the following.
Troubleshooting has completed.
Problems found!
(1) Service registration is missing or corrupt. FIXED! (GREEN CHECK)
(2) Windows update error 0x80070490(2016-07-04-T-11_57_15P). FIXED! (GREEN CHECK)
(3) Problems installing recent updates. FIXED! (GREEN CHECK). My laptop is 15-e043cl win 8.1 PRO. ANY THOUGHT OF WHAT MIGHT BE WOULD BE REALLY HELPFULL Thank you.
Wow! It worked for me! Thanks for the valuable solution.
I have an interesting problem –
Windows Modules Installer Worker works, takes some memory, CPU, and HDD usage, but Windows Update is up to date, and not looking for or doing anything. Is it possible to find what exactly that process doing in that moment?
Delta Airlines
Thanks for the great article.
http://www.itsupportforum.net/topic/windows-modules-installer-worker-high-disk-usage/
Despite having everything set to manual,windows module installer worker is running anyway.making computer unusable.
me too!
Thanks for sharing,
WU diag fixed 1 error and now TIworker.exe/high CPU is gone.
Such a nice article, I loved visiting your website.
Nice post by admin
Hi Belayet Hossain,
First of all thanks for sharing this article on Windows modules installer worker – High CPU usage its great information.
Superb helpful article. This is so amazing and helpful to update information.
You are most welcome Madden.
Thanks Brian, Visit frequently.
I am glad that it could help you, csgo skins!
You are welcome, NBA2K16!
I am glad, NBA2K16!
My pleasure, Anonymous!