
Hey, are you looking for the secrets to Getting iPad air 2 screen replacement to complete tasks quickly and efficiently? Because your iPad screen might be fractured, and you need to repair that. Then, you are at the proper place. Welcome, to the article about Secrets to Getting iPad air 2 screen replacement To Complete Tasks Quickly and Efficiently. In this essay, we will notify you how to replace the screen on an iPad air 2 step by step. Also, we are going to talk about screen repairing kits, servicing costs, replacement services, and so on. Keep patience and read the whole article and you will not get disappointed. We will try to make the process easy for you though it is hard. If at any point you get confused learn more on BreakfixNow’s site. So, let’s see what is waiting for you in this article today below.
• iPad air 2 screen replacement
• iPad air 2 screen replacement service
• iPad 2 screen repair cost
As it is a complicated process, you have to be very much cautious. Let’s steer into the topic
iPad air 2 screen replacement
Follow the process to replace a broken front panel assembly on an iPad Air 2 efficiently. The front panel or display assembly contains the glass digitizer on top and the fused LCD at the bottom. These 2 parts are not separable and must replace as one piece In the iPad Air 2. Remember that, iPad’s logic board is combined with the fingerprint scanner in the home button. To prolong Touch ID functionality, you have to relocate the original home button of your iPad when you are assembling the new display. This process can fix issues like a non-responsive touch screen, a cracked glass digitizer, or a broken LCD screen. The process will also help you to fix the iPad air 2 digitizer replacement as well as iPad Air 2 LCD replacement.
You will need some tools (iPad air screen replacement kit). To complete the process. Here is the list of tools and parts below.
Tools
1. Opening picks (a set of 6 pieces)
2. Opening tools
3. Opener
4. Suction handle
5. iPad battery isolation pick
6. Spudger
7. Phillips #000 Screwdriver
8. Phillips #00 Screwdriver
Parts
1. iPad Air 2 LCD Screen and Digitizer
2. iPad Air 2 Wi-Fi Adhesive Strips
You can buy those tools and parts online or offline.
Here, you have to go through 47 steps. Moreover, you will be needed 1-4 hours to accomplish. Don’t fear because we are here. We will try to make it as simple as we can though the task is difficult. So, without wasting more time let’s start.
Here you will also get all the information for the following keyword: iPad air 2 screen repair, iPad air LCD replacement, etc.
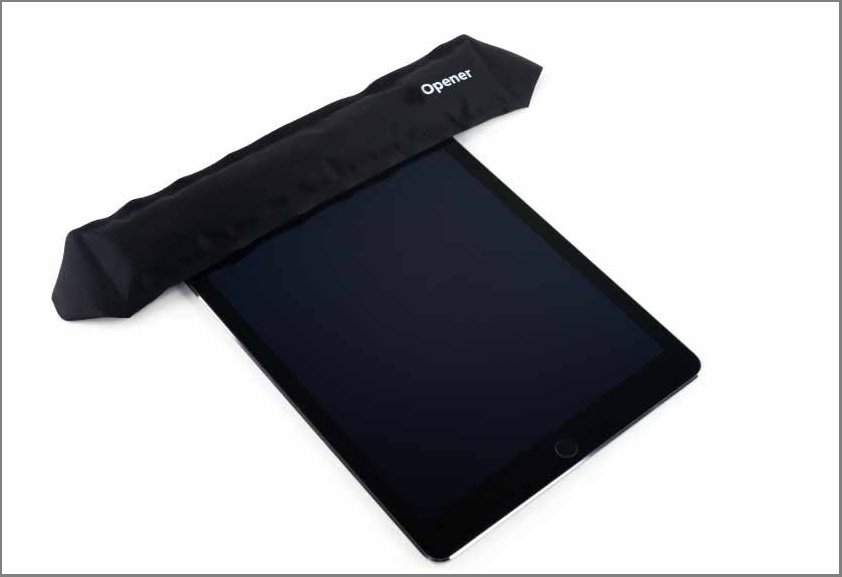
Step 1 (Heating Opener)

Put the Opener at the center of your microwave.
Note – Our recommendation to you is that you should clean your microwave before starting. Any nasty liquid on the bottom might end up immobilizing to the Opener.
Warning – For carousel microwaves: The plates should spin freely. If your Opener gets immobilized, it might get overheat and burn.
Step 2

1. Heat the Opener about thirty seconds
2. You will need to reheat the Opener for another thirty seconds several times during the procedure when the Opener gets cool.
Caution
1. Be cautious not to overheat the Opener during the process. Overheating might cause immobilization or burst the Opener.
2. Never touch it if it appears inflamed.
3. A properly heated Opener could stay warm for up to 10 minutes. If it feels too hot in the middle to touch, you can continue using it while waiting for it to cool down some moment before reheating.
Step 3

Take away the Opener from the microwave. To avoid the hot center, hold it by one of the two flat ends.
Caution
Be cautious when handling the Opener, because it will be very heated.
Step 4- iPad air 2 opening process
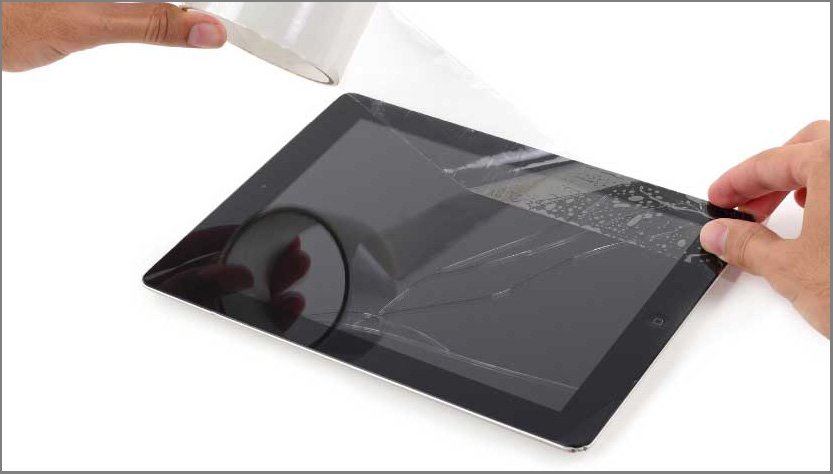
1. If your display glass is broken or fractured, tapping the glass keeps further breakage contained and prevents physical harm during your repairing process.
2. Cover the whole screen with strips of clear packing tape over the iPad display.
Note- this will help you keep those glass shards suppressed. It will also stipulate structural integrity during prying or rescuing the screen.
3. Follow the rest of the guide attentively as described. Notwithstanding, once the glass is broken, it will probably keep on cracking as you work, and you may need to utilize a metal prying device to scoop the glass out.
Caution
To protect your eyes, wear safety glasses. Be cautious that the LCD screen does not get damaged.
Step 5
Note – The front panel of the iPad is held with an adhesive element. In the following steps, the Opener will help to soften the adhesive which is holding the front panel assembly in place. Make sure you heat the Opener for no more than 30 seconds in the microwave.
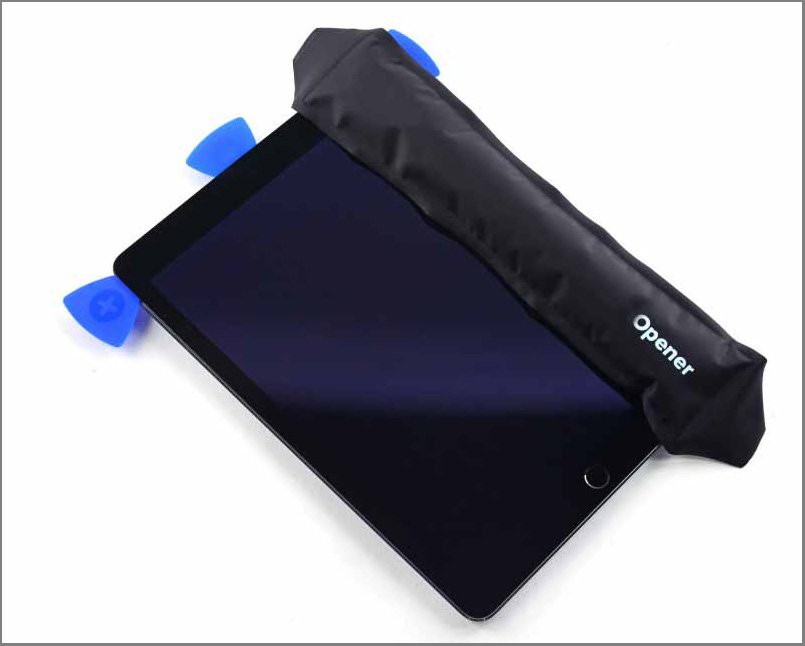
1. Dealing with it by the tabs on either end, put a warmed Opener over the top edge of the iPad.
2. To make the adhesive soften by securing the front panel to the rest of the iPad, let the Opener sit up on the iPad for two minutes.
Step 6

Note – While the iPad looks uniform, given the circumstances, there are fragile segments under specific parts of the front glass. To keep away from harm, just avoid prying in the ranges following each process.
As you take after the headings, take exceptional care to abstain from prying in the accompanying zones:
1. Primary camera
2. Front camera
3. Home button
Step 7

Put a suction cup over the iPad’s front camera and press down to make a seal.
Note – To get the most use, but the suction cup as near the edge as conceivable without going past the brink of the screen.
Step 8

1. Solidly pull up on the suction glass to make a little hole in the front board and the back case.
Caution
Try not to pull too hard, or you may smash the glass.
2. Once, you get a sufficient gap with the help of the suction cup, to prevent the adhesive from resealing put an opening pick.
Step 9

1. Drive the pick along the edge of the screen, towards the earphone jack.
2. If there is still enough resistance while pushing the opening pick, you have to reheat the Opener during the process. If needed you can apply additional heat as well, but that is not preferable.
Caution
Be mindful so as not to give the opening pick a chance to slide between the fused LCD and front board, as doing as such can forever damage the display.
Note – A decent general guideline is to never embed the opening pick more than a quarter-inch into the iPad.
Step 10
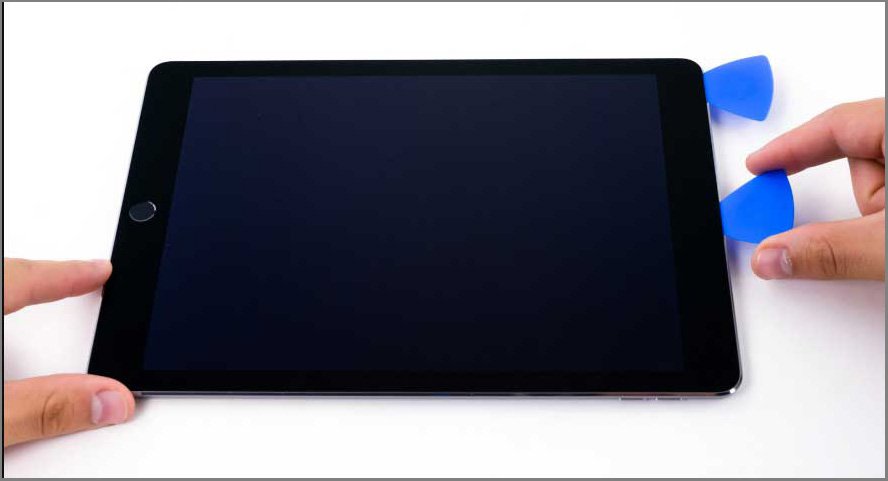
1. Put a second opening pick at the front camera side.
Step 11

1. Towards the Sleep/Wake Button, slide the second pick along the top edge of the iPad.
Step 12

1. It is time to put the third pick by the front camera.
Step 13
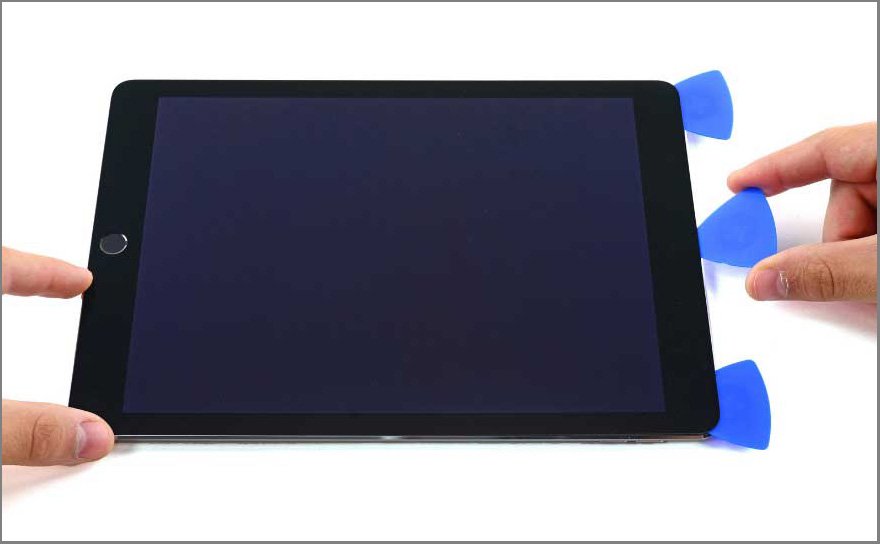
1. Take the opening pick from the right side and around the upper right corner of the iPad.
Step 14

1. Take the opening pick from the left side around the top left corner of the tablet
Step 15
1. Now, reheat the Opener. Lay it up in the right part of the display to strike off the adhesive.
Step 16

1. Take the opening pick from the right side halfway down of the screen.
Step 17
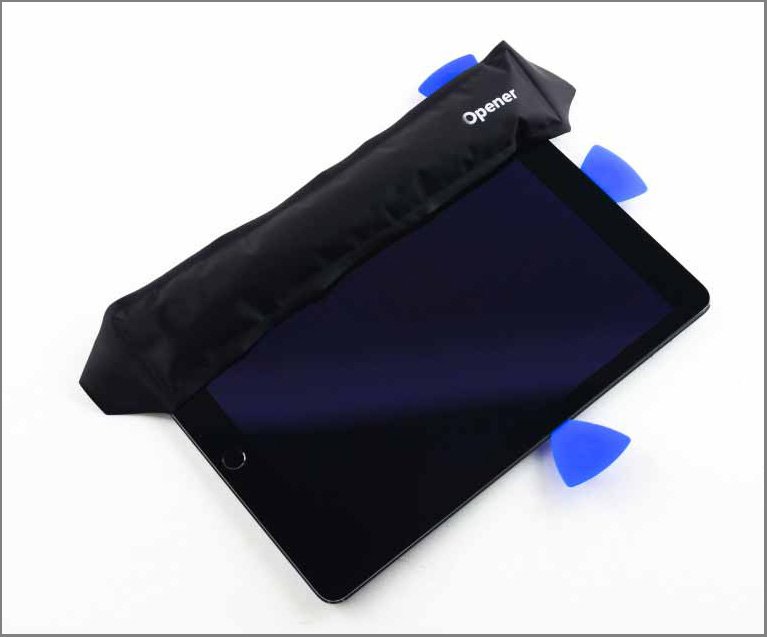
1. Again, reheat the Opener. Now apply heat with the help of the Opener to the left edge of the iPad.
Step 18

1. Take the opening pick from the left side halfway down of the screen.
Step 19

1. Take the opening pick from the right-side bottom of the screen.
Note – if needed, reheat the Opener.
Step 20

1. Take the opening pick from the left-side bottom of the screen.
Recommended:
Apple iPhone 5SE review [Exclusive]
Apple Earpods with Remote and Mic | Ultimate Tips & Tricks
iOS 9 Battery Drain – Best Tips & Tricks to Extend Battery life
iPad Pro 9.7 review | Smart Keyboard Tricks
Apple iWatch – Outstanding Tips & Tricks
Best adhesive for cellphone repairing
Step 21
1. Now, using Opener apply heat to the lower part of the display.
Step 22

1. Take the opening pick from the right side to the bottom corner of the screen.
Step 23

1. Do the same with the opening pick from the left side.
Note – heat and reapply the Opener as required. Continuously hold up no less than ten minutes previously heating the Opener.
Step 24

1. Remove the opening pick from the right side from the bottom of the screen.
Step 25

1. Take the left opening pick to the lower part of the screen. When you took it down to the right corner, remove it.
Caution
Be exceptionally cautious to not embed the pick more than a quarter-inch into the display to abstain from harming the Home Button and display links underneath.
Step 26

1. To separate the top edge of the screen, you have to twist the remaining pick by the front camera
Step 27
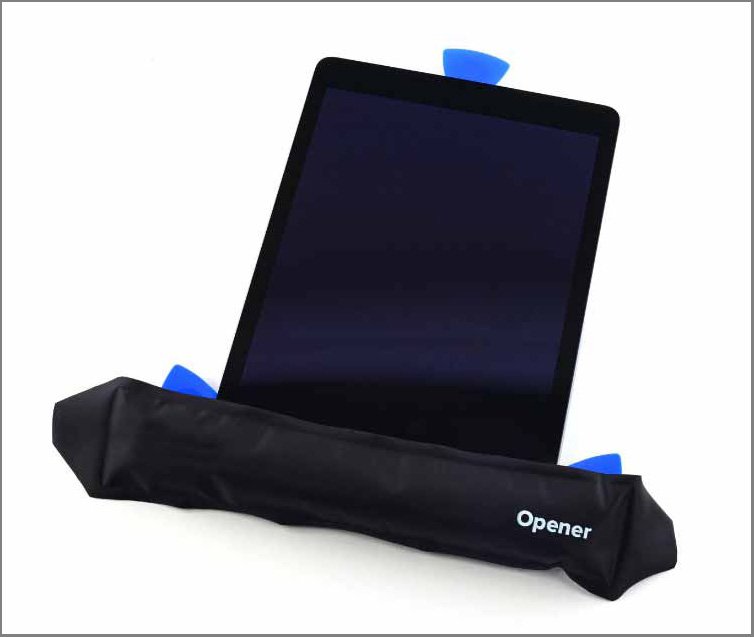
1. Keep lifting the screen get-together from the front camera.
2. Force the display marginally far from the base edge to separate it from the back case.
3. Continue lifting until the point when the screen gets together is opposite to the body of the iPad.
Caution
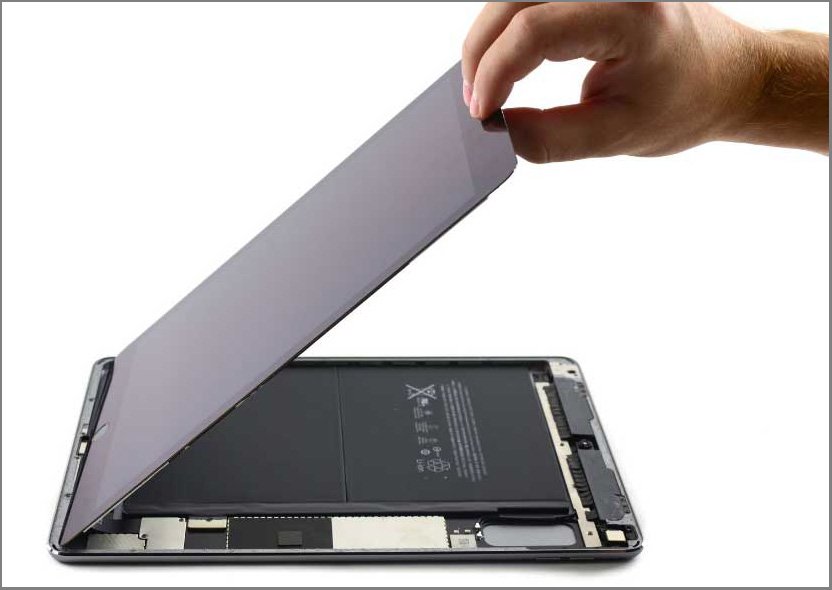
If the screen is still attached to the back case by three delicate ribbon cables, don’t attempt to remove the screen.
Step 28
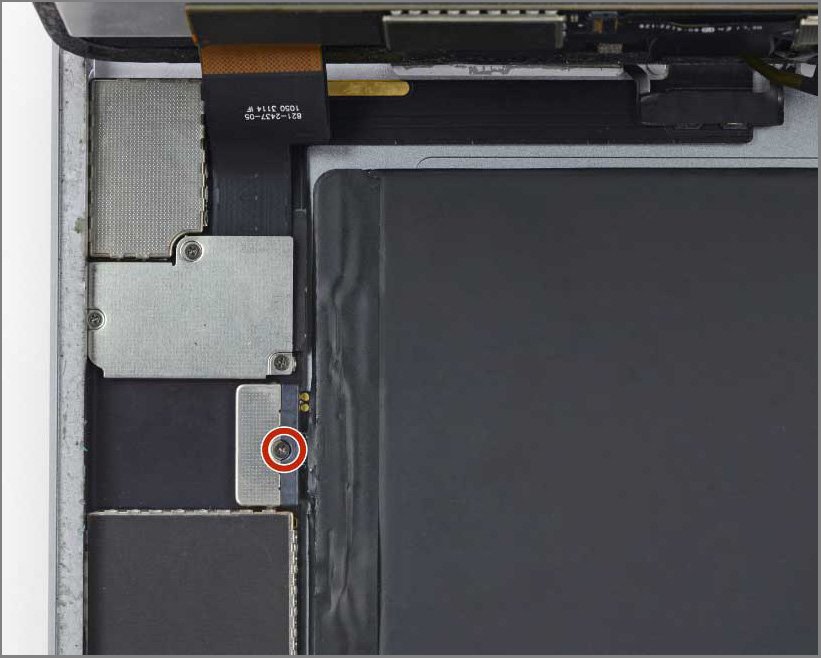
To secure the battery terminals to their contacts on the logic board, remove the single 1.8 mm Phillips screw.
Step 29

Note – You can use a battery separation pick to disconnect the battery and to reduce the risk of short.
1. Slide a battery separation pick underneath, which is in the battery connector area of the logic board.
Step 30

1. Now, remove the three Phillips screws(1.3mm) from the display cable bracket.
2. Then, take away the bracket.
Step 31

1. Separate the display data connection from its attachment on the logic board.
Step 32

1. Separate the two-residual digitizer underneath the display data cable.
Step 33

1. Now, Separate the front board from the back case.
Step 34

1. Then, apply a plastic opening Instrument to pry the section off the back of the Home Button.
Note – While exchanging the part to your new display get-together, utilize a touch of adhesive to secure the section to the screen.
Step 35

1. Evacuate the Home Button bracket and peel up the tape associated with it.
Step 36

1. Peel up the tape with the help of tongs covering the Home Button ZIF connector.
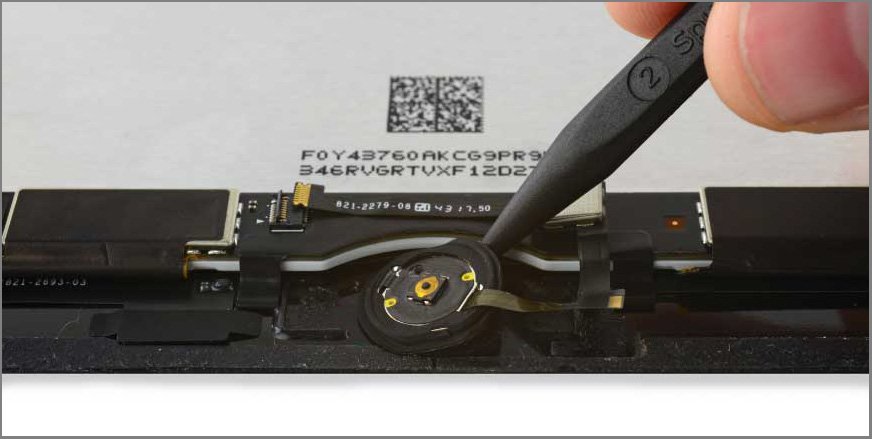
Step 37

1. Applying the flat end of a spudger, flip up the absorbent flap on the Home Button cable socket.
Step 38
1. Time to take away the home button ribbon cable.
Step 39
1. Using the flat end of the spudger, peel up the Touch ID control chip and Home button ribbon cable.
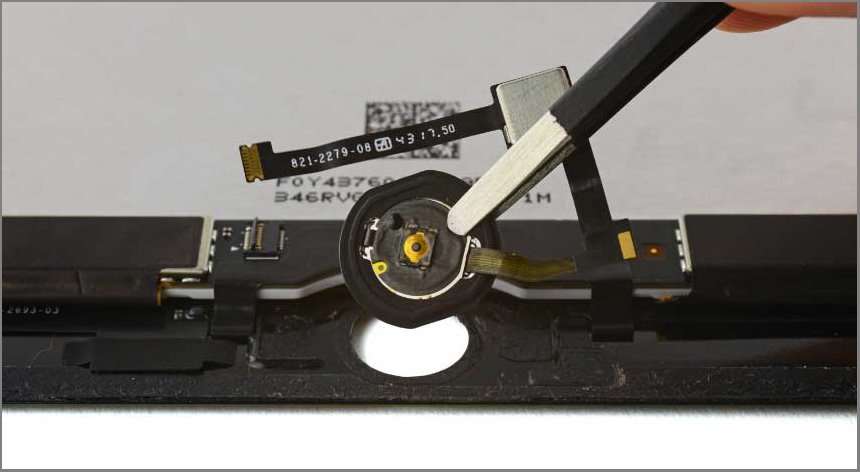
Step 40
1. Peel up the Home Button ribbon cable.
Step 41

1. Heat your Opener again. Set it over the bottom part of the display to slacken the adhesive on the home button gasket.
Note- Before moving on to the next step, wait about two minutes to soften the adhesive.
Step 42

Caution
In the following process, you will be isolating the home catch gasket from the iPad’s front board. This gasket is to a great degree fragile and can tear effortlessly. If the gasket does not separate completely from the front board, reapply heat utilizing the Opener before proceeding.
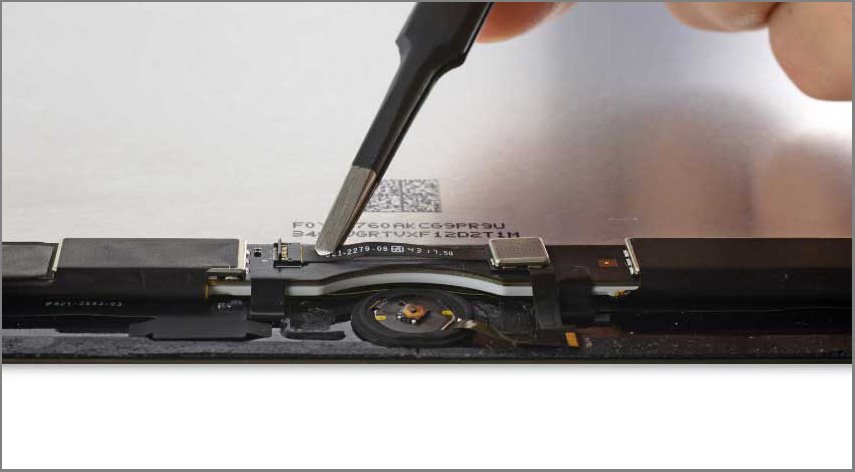
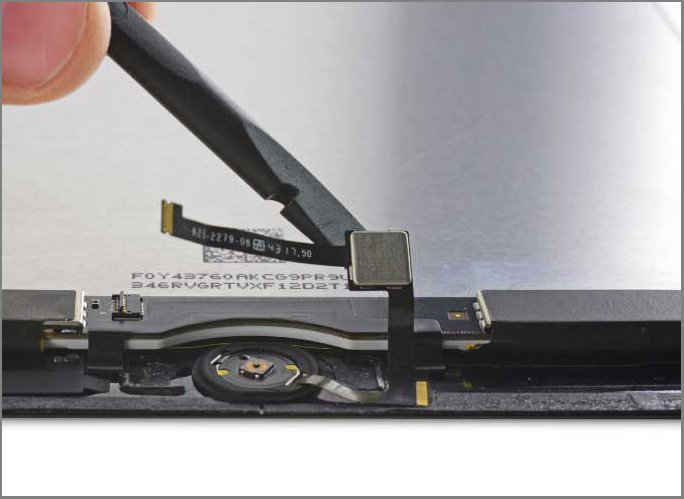
1. To marginally pry the home button assembly up from the display, use the pointed end of a spudger.
Step 43
1. Till the gasket is fully separated from the front panel, continue working the tip of the spudger around the edge of the gasket.
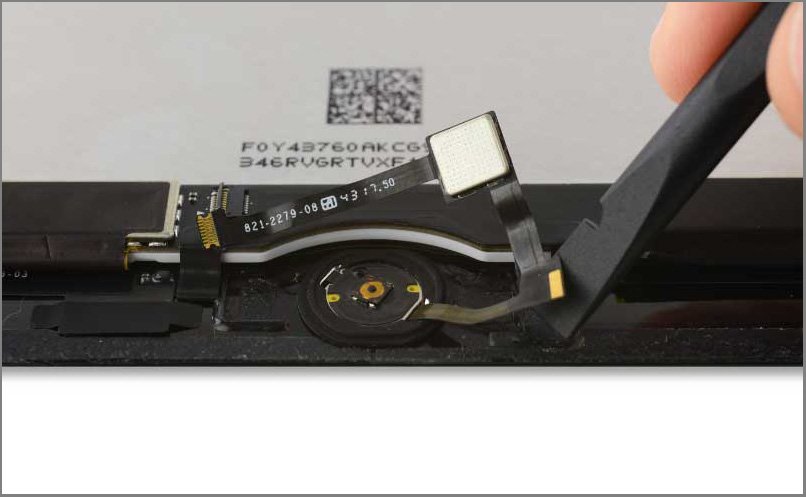
Step 44
1. Take away the home button assembly.
Step 45 – Display Assembly

1. Inspect your new part and your original display. Be sure; they match carefully.
2. Your substitution screen might be missing the sleep/wake sensor that is fundamental for Smart Cover employments. You will need to transfer the components if you want to maintain functionality.
3. To remove the sensor assembly cable, desolder the four solder pads from the lower left of the display.
Step 46
We include a video for you in this step. This video informs you of the process of desolder the sensor flex cable and reassigning it to the new display.
Step 47

1. Display assembling remains.
Note – To reassemble your device, follow these instructions in reverse order.
iPad air 2 screen replacement service
There is a lot of iPad Air 2 screen replacement service in your local place as well as online. However, all of them, the most trustworthy service you will get from official apple services. So, we are recommending you to use apple services. Here you will get all the information for these keywords: iPad screen repair cost, iPad mini screen repair cost, cracked iPad screen repair cost, iPad Air screen replacement cost, iPad 2 screen repair cost, etc.
To what extent will it take?
After you send in your iPad for assistance, you will get a substitution or your fixed iPad in three to five business days. A replacement iPad will be new or proportional to new in both execution and consistent quality. On the off chance that Apple engraved your iPad, it could take up to two weeks.
What does it cost?
Repair and substitution costs rely upon your iPad show and your AppleCare item scope. Coincidental harm is not secured under the Apple One Year Limited Warranty.
Have AppleCare+?
AppleCare+ covers two episodes of coincidental harm, each with a $49 benefit charge. You can likewise utilize our Express Replacement Service to get a substitution even before sending us your iPad. You can check that you have AppleCare+ by entering your iPad serial number.
Out-of-warranty* cost
• iPad mini, iPad mini 2: $199
• iPad, iPad 2, iPad Air, iPad fifth generation: $249
• iPad third era, iPad fourth generation, iPad mini 3, iPad mini 4, iPad Air 2: $299
• iPad Pro 9.7-inch: $379
• iPad Pro 10.5-inch: $449
• iPad Pro 12.9-inch and/or iPad Pro 12.9-inch (second era): $599
Furthermore a $6.95 shipping expense. Expenses are in USD and exclude local tax.
Note – *Accidental harm is not secured under the Apple One Year Limited Warranty.
Ensure you move down your iPad before you send it to Apple or convey it to an Apple Retail Store.
Conclusion
Thank you so much for reading this article about Secrets to Getting iPad air 2 screen replacement To Complete Tasks Quickly and Efficiently. We tried our best to make it as easier as we can. We hope this might help you to fix the iPad Air 2 screen replacement. Please let us know your opinion about this in the comment section.
You might also like:
Apple iPhone 5SE review [Exclusive]
Apple Earpods with Remote and Mic | Ultimate Tips & Tricks
iOS 9 Battery Drain – Best Tips & Tricks to Extend Battery life
iPad Pro 9.7 review | Smart Keyboard Tricks
Apple iWatch – Outstanding Tips & Tricks
I’m a tech enthusiast, entrepreneur, digital marketer and professional blogger equipped with skills in Digital Marketing, SEO, SEM, SMM, and lead generation. My objective is to simplify technology for you through detailed guides and reviews. I discovered WordPress while setting up my first business site and instantly became enamored. When not crafting websites, making content, or helping clients enhance their online ventures, I usually take care of my health and spend time with family, and explore the world. Connect with me on Facebook, Twitter, Linkedin or read my complete biography.
Trackbacks/Pingbacks