


How to Recover Deleted Messages on iPhone 13?
You’re going through your old photos in your Photo Gallery on your iPhone 13 when suddenly a very important picture is deleted out of nowhere. Maybe it was a picture of your loved one, a screenshot of some information you had saved for later use, or simply a picture that reminds you of sweeter times, nonetheless, you’re frustrated now and you can’t wait to recover your deleted photos from your iPhone 13.
Don’t stress out. Here is a step-by-step guide to recover deleted messages from iPhone 13, and the same goes for photos, contacts, etc.
Recover Your Lost Data from iPhone 13 Using Dr.fone- Data Recovery (iOS)–A Complete Mobile Device Solution
If you want a quick fix without wanting to waste time on recovering your deleted data manually, try Dr.Fone. It is a trusted data recovery software that would restore all your lost data, may it be from your device or iTunes/iCloud backup.
It has a simple, user-friendly interface, and the software has various features. The latest version of this software helps you to conduct multiple operations of your smartphone easily and with a few clicks on your computer
Dr.Fone does everything; from WhatsApp transfer and phone backup to data recovery and system repair. Not only this, but it is also compatible with all iOS devices and the instructions to use it are pretty simple:
- Download Dr.Fone on your computer.
- Connect your iPhone 13 with a USB cable to your computer.
- Launch Dr.Fone – Data Recovery (iOS) on your computer and select ‘Data Recovery.
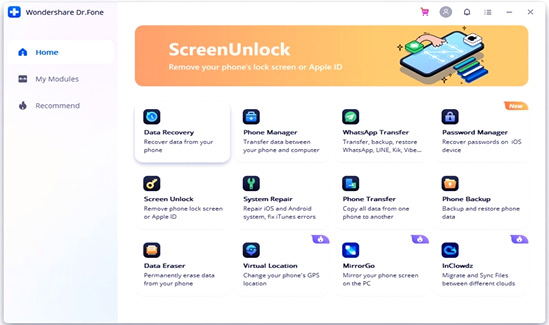
Dr.Fone will detect your device in a while and you’ll see the following display on your screen:
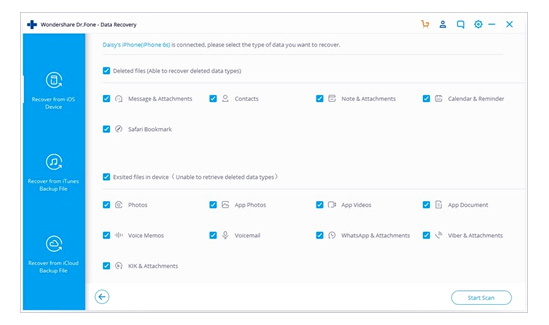
- When using Dr.Fone, don’t launch iTunes to prevent automatic sync. You can disable this before using Dr.Fone by launching iTunes and going to Preferences → Devices and checking the option called ‘Prevent iPods, iPhones, and iPads from syncing automatically.
- Click on the ‘Start Scan’ button at the bottom of the page. This would scan your iPhone 13 for all the deleted data that can be recovered.
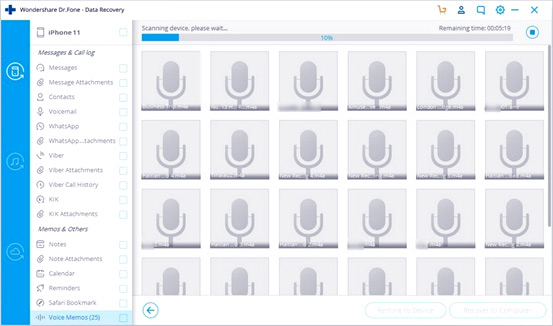
- Once your scan Is complete, you’ll see both existing and deleted data on the screen.
- You can turn on the option for ‘Only display the deleted items to filter your data and make it easier for you to search your lost data to recover.
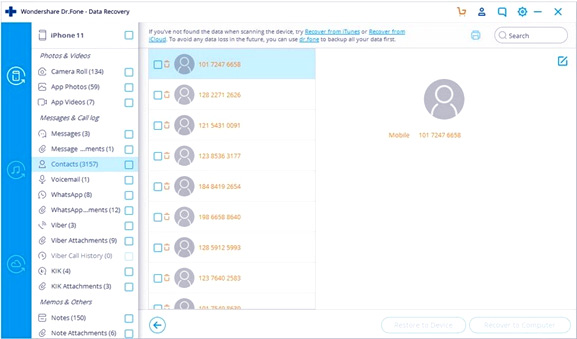
- After you find the deleted messages and photos that you want to recover, simply check the box in front of that particular photo or message and click either ‘Recover to Computer’ for your data to save in your computer or ‘Restore to Device’ for your data to go back to your device.
How to Recover Deleted Photos From iPhone 13 — A Manual Approach
Pictures that you have recently deleted can be recovered easily if you have captured them using iPhone 13’s camera application. These photos are saved in your Photos application. But it depends on the amount of time that has passed since they were deleted.
To recover deleted photos from iPhone 13, follow the instructions below:
- Go to your iPhone 13’s home menu.
- Select the Photos app and you will see various albums displayed in front of you. See the picture below.
- Select the folder called ‘Recently Deleted.’ It has all the photos that you have recently deleted. The photos in this folder are kept here for 40 days after you delete them. After this, they are permanently deleted.

- Click on the picture that you want to recover and select ‘Recover.’
- iPhone 13 would display the selected photos for you. Click ‘Recover Photo’ when you are sure those are the ones you want to restore. You can find your restored photos in your Photos app.
How to Recover Deleted Data from iTunes Backup
iTunes backup keeps all your local data available on your iPhone 13. This includes your text messages, photos, call logs, local application files, etc. Try to always back up your data to iTunes and keep it updated if you don’t want your iPhone to lose your data and overwrite it.
To recover deleted photos and messages from iPhone 13 using iTunes backup, follow the instructions below:
- Open your iTunes account on your computer and log in to your account.
- Connect your iPhone 13 to your computer using a data cable.
- You’d see your device on iTunes as seen in the picture below.
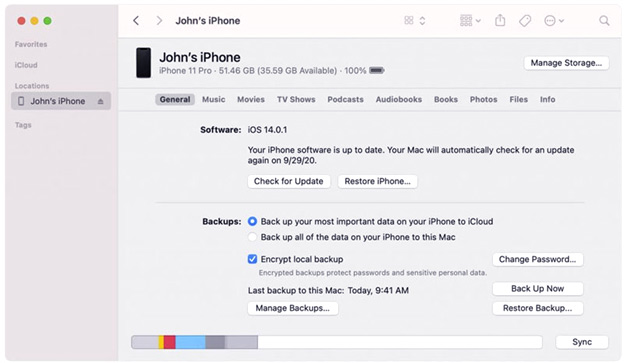
- Click on ‘Restore Backup’ and you’ll see a list of dates that your iPhone was backed up.
- Click on the date that you think would contain the backup that has your deleted messages of photos.
- Now your backup data will be restored to your iPhone. After this, your iPhone will restart.
- After the restart process is complete, your computer will sync. Disconnect your computer from your iPhone after this sync is complete.
How to Recover Deleted Messages on iphone 13
Using your iCloud backup is another way to recover deleted photos and messages from your iPhone 13. Make sure you have the same sim card in your iPhone that you used to send or receive messages on. Follow these steps for quick recovery of your lost data:
- Go to ‘Settings’ on your iPhone 13 and select Name → iCloud → Backup to enable the backup of Cloud.
- Reset your phone.
- After your phone resets and turns on, select ‘Apps and Data on your iPhone.
- Sign in to your iCloud account and select ‘Restore/Choose Backup.’ This would recover all your deleted data automatically.
Final Thoughts
All the solutions listed above would work well for you, but we can see that Dr.Fone – Data Recovery (iOS) is the fastest and most efficient solution to recovering deleted messages and photos from your iPhone 13 without any hassle. It is software that isn’t limited to only recovering your data, but also aids in transferring data without wasting your time on manual, lengthy solutions. It works with thousands of Android and iOS devices, and wouldn’t fail you when you need a quick solution without any glitches.
I Hope, we understand How to Recover Deleted Messages on iPhone, 13 as well as recover photos.

Belayet Hossain is a Senior Tech Expert and Certified AI Marketing Strategist. Holding an MSc in CSE (Russia) and over a decade of experience since 2011, he combines traditional systems engineering with modern AI insights. Specializing in Vibe Coding and Intelligent Marketing, Belayet provides forward-thinking analysis on software, digital trends, and SEO, helping readers navigate the rapidly evolving digital landscape. Connect with Belayet Hossain on Facebook, Twitter, Linkedin or read my complete biography.